
by Stefan Lonce
If you’re looking for a place to use the caviar you found at the gourmet market…this isn’t the place for you! I’m far from Martha Stewart. Yes, I do plan meals, but come the end of the week, I usually cook by looking in my ‘fridge and seeing what’s about to go bad.
You see, my mother was born in 1927…just in time to be weened during the great depression. So, I was not only raised to believe the waste of food was a sin…but I was raised to believe that THE WASTE OF FOOD IS A SIN!!!!
Unfortuantely, my dear, kind, mother, who would open her home to anyone in need alothough she was widowed early with six sons of her own to raise, truth be told, was a lousy cook. Of course, her kindness made up for her lack of culinary skills. Our leftovers, which weren’t that good on the first time around, would be wrapped in foil and thrown into the oven and we would fight over “the good stuff.”
Well, I found the solution to that problem…PIZZA! After all everything tastes good on PIZZA.
You see, I don’t own a pizza stone, nor even a pizza pan. Although my partner says, I make better pizza than any of the pizza joints around us…and I live in NY! I do, however, always have mozzarella and parmesan cheeses in my ‘fridge.
The only thing you need for this is a very basic pizza dough recipe, some sauce, cheeses, and whatever you have in your fridge that you’d like to use…and your imagination.
Of course, you can go out and shop for toppings if you’d like, but really, I use pizza to clean out my fridge. After all, why throw your hard earned money in the garbage?
So, here is my “clean out your ‘fridge” pizza recipe:
DOUGH:
1 package active dry yeast (2.25 teaspoons)
1 cup warm water ( 105 – 115 degrees)
1 teaspoon sugar
2 talespoons olive or vegetable oil
1 tespoon salt
2.5 cups all purpose flour +/-
DIRCTIONS:
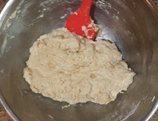 Dissolve yeast in warm water in medium bowl with sugar, and let rest and ‘bloom’ for 10 minutes. Add oil and salt and whisk together. Stir in flour, ½ cup at a time until you have a somewhat cohesive mixture (it may look gnarly, but that’s OK). Pour the mixture onto a lightly floured surface, and knead until the dough feels smooth and elastic (don’t worry, you’ll feel it, it should only take a minute or two.).
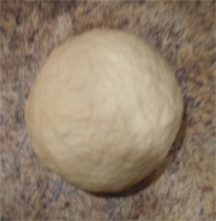 Form the dough into a ball, and put it into a medium sized lightly oiled bowl. Toss to coat the dough with the oil. Cover with plastic wrap and put aside to rise. If you’d like to make your pizza now, let the dough rise for an hour at room temperature. You can also make this dough early and let it rise slowly in your refrigerator for 6 hours or up to 36 hours…this will give you a more “pizza parlor” flavor to your dough…don’t ask me why…I’m not really a chef.

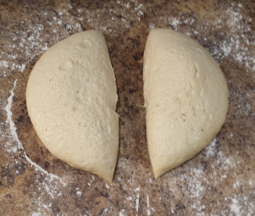 Pour the risen dough onto a lightly floured surface. If you prefer a thicker, chewier crust, use the entire dough…if you prefer a thinner, crisper crust, divide the dough into two. The second piece of dough can be frozen in a freezer bag, and defrosted in the refrigerator at a later date.
Preheat oven to 425°.
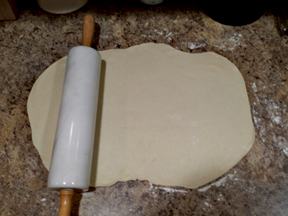 Roll the dough out to fit whatever pan you are using…the darker the finish the better…I use a twenty year old “cookie sheet” that has darkend over the years with the roasting of chicken thighs, pork chops, etc. Admit it, we all have one or two. If you have a pizza stone, etc., go for it!
Coat your pan with a tablespoon of oil. Use your hands to spread the oil over the pan…this will oil your hands for when you handle the dough which may be sticky. Transfer the dough to the pan. The dough will be very elastic…but don’t worry…it also has a lot of give. 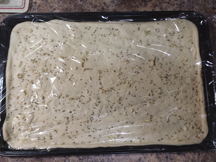 Once it is in the pan, use your oiled hands to form it to the pan. Don’t worry if you develop some holes,,,the dough is very forgiving. Just use your hands to “repair” them. Form whatever rim around the pie you would like. I prefer a very small rim to allow toppings in every bite.
Sprinkle the Diced Garlic and Italian Seasoning over the top of the crust. Cover the pan with plastic and allow it to rest for 30 minutes. After it has rested, dock the dough (puncture with a fork all over so no air bubbles develop upon baking).
TOPPINGS:
1 clove diced garlic
½ teaspoon Italian Seasoning (or a combination of dried basil and oregano.
¼ cup your favorite pasta sauce
2 cups shredded Mozzarella cheese
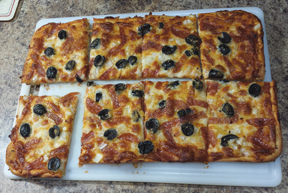
1 cup WHATEVER TOPPINGS YOU HAVE ON HAND (for this particular recipe, I happened to have a little PEPPERONI in my deli drawer, some leftover BLACK OLIVES from Tex-Mex night, and half an ONION. I’ve also used…LEFTOVER MEATBALLS, SAUSAGE, PEPPERS, MUSHROOMS, BROCCOLI CROWNS, CHICKEN, CORN, EGGPLANT, PORK, BACON, LONDON BROIL… You get the idea. Check your ‘fridge…the sky’s the limit! The PIZZA POLICE are not going to show up at your door and take you away. Just be sure your meats are pre- cooked.)
¼ cup grated Parmesan cheese

 Spread the sauce with the back of a spoon across the crust. IF YOU THINK IT ISN’T ENOUGH… THEN IT’S PERFECT!
Sprinkle the Mozzarella evenly over the crust. Spread your toppings evenly over the pizza. Sprinkle the Parmesan over the toppings.
 Bake in pre-heated 425° for 15-20 minutes, depending on the thickness of your dough and how “done” you like your toppings.
Move to a carving board and slice into as many slices as you like. Pictured is HALF OF THE DOUGH, ON A 10’ x 15” SHEET PAN…A “THIN, CRISPY CRUST”. THE SAME SIZE PAN COULD BE USED WITH ALL OF THE DOUGH AND MAKE A CHEWY THICKER CRUST.